Tiltmeters are used to monitor deflection, vertical rotation, and deformation in the diaphragm and retaining walls.
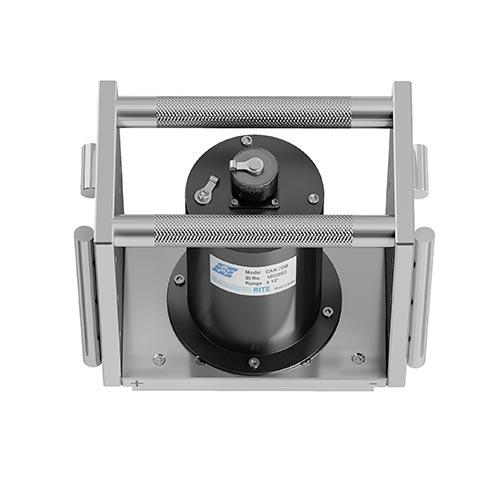
Encardio Rite Model EAN-70M is a portable tiltmeter that uses an anodized aluminum housing that contains an accurate accelerometer and a suitable signal conditioning circuit.
The accelerometer picks up the force of acceleration due to gravity which reaches its highest when the accelerometer is rotated to a full 90˚tilt position and touches zero when the title angle of the accelerometer is 0˚.
For other angles, the force of acceleration is calculated by equating the product of the sine of tilt angle to the acceleration due to gravity.
The tilt sensor produces a bipolar DC voltage output proportional to the sine of the tilt angle measured by the tiltmeter. The voltage output measures zero volts for a truly vertical sensor. The sensor presents a relatively low-cost tilt measurement solution with superior resolution, long-term stability, and low thermal sensitivity.
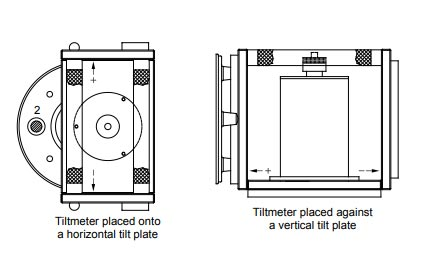
A tiltmeter is used to monitor the change in the tilt of any horizontal floor or vertical surface by setting it on a fitting tilt place, which is accessible separately.
The portable tiltmeter is not made for the absolute determination of the tilt of structures. A reference tilt plate is attached to the structure through which the change in the tilt of the structure is measured.
Once the tilt plate is mounted, the initial tilt reading for each tilt plate is monitored and recorded. The change in the tilt of a structure is then calculated by subtracting the initial tilt reading from the subsequent tilt reading.
Tilt Plate
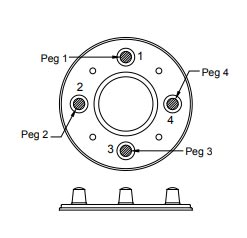
A tilt plate is a disc-like structure of 142 mm in diameter made from Aluminium. It is attached to the structure using four Hilti anchors HPS 1-6/15×40 # 260350 or equivalent. If the structure has a smooth surface like marble or granite, the tilt plate is bonded to it by epoxy. The four pegs on the tilt plate are used to position the tiltmeter.
A horizontally mounted tilt plate allows tilt readings in two planes that are at 90o to each other. A vertically mounted tilt plate allows tilt readings along one vertical plane only.
Read more: Wireless tilt meter – Introduction, Application, Features & Operating Principle
Tiltmeter
A portable tiltmeter, as the name suggests is shifted from one tilt plate to another to monitor the reading. With the help of alignment bars which are provided on the front, the bottom, and the rear side, the tiltmeter is precisely placed on the tilt plate.
For each tilt plate, the readings are taken twice. One reading in the plus direction and another in the minus direction. The base of the tiltmeter has proper + and – marks to provide complete guidance.
Taking readings
Before taking the reading of the portable tiltmeter, allow it to be adjusted to the ambient temperature. If it is feasible, store the tiltmeter at the same temperature as at the time of taking the reading.
The next step is to connect the tiltmeter to the readout unit and switch it on. Take readings as stated.
Read more: What is a Portable Tiltmeter & How is it Installed?
Reading horizontal tilt plates
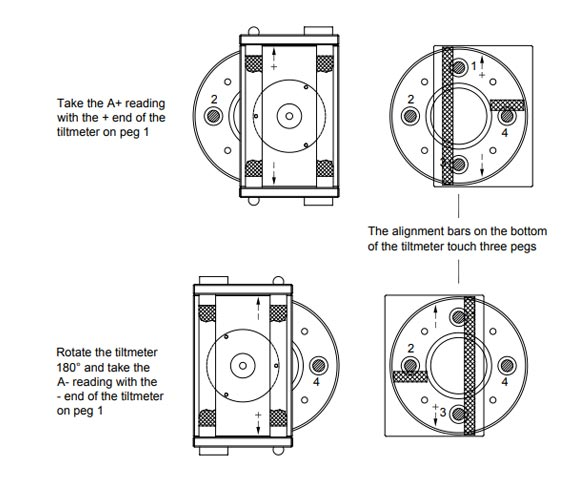
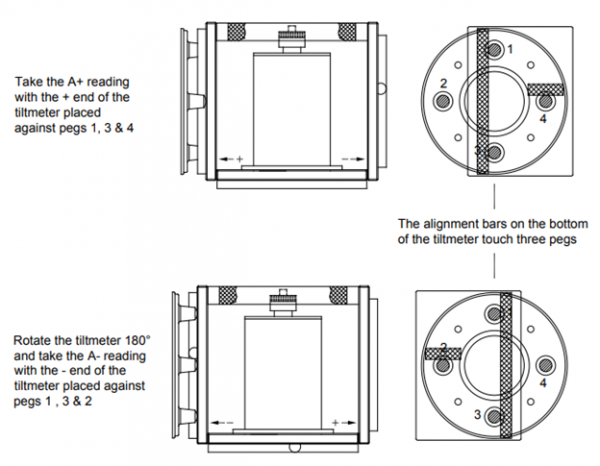
- The first step is to take the reading in plane A, the direction of which is determined by pegs 1 and 3. Place the “+” end of the on Peg 1, and capture the reading after stabilizing it. Rotate the tiltmeter 180 degrees to place the “-” end of the tiltmeter on peg 1, and capture the reading.
- Repeat the above step at least 2-3 times to ensure that the correct readings are recorded. The “+” and the “-” readings should be identical except for their signs. With the Encardio Rite Readout Unit, there can be a difference up to 0.0003 due to the bias of the sensor and small irregularities in the tilt plate.
- The above procedure for taking readings is illustrated in the pictures below.
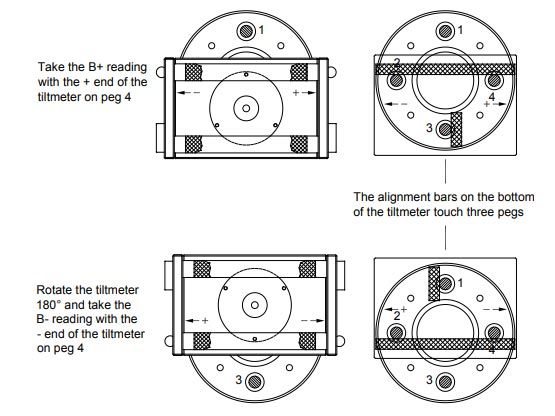
- The next step is to take the reading in Plane B, which is determined by the direction of pegs 2 and 4. Similarly, like the Plane A readings, place the “+” end of the tiltmeter on peg 4, capturing the reading after stabilization. Rotate the tilt meter 180o and place the “-“end of the tiltmeter on peg 4, doing the same.
- The “+” and the “-” readings for plane B should be identical except for their signs. As with Plane A readings, there can be a difference up to 0.0003 due to the bias of the sensor and small irregularities in the tilt plate.
- The above procedure for taking readings is illustrated in the pictures below.
Read more: MEMS Tiltmeter- Installation Procedure & How does it work?
Reading vertical tilt plates
Similarly to the horizontal tilt plates, Vertical tilt plate readings are defined by the direction of pegs 1 and 3. Using alignment bars at the end of the tiltmeter, the instrument is aligned.
- The positive “+” end of the portable tiltmeter is placed against peg 1 while taking the reading.
- Similarly, the negative “-” end of the instrument is located against the peg 3. The readings are taken after they are stabilized.
- Repeat these steps three times to ensure that you have good repeatable readings.
- Repeat the above steps two to three times to ensure readings are repeatable.
- In theory, readings should be identical except for different signs (+/-). In practice, there is a difference up to 0.003 on the Encardio Rite readout unit between the two readings due to the bias of the sensor and small irregularities in the tilt plate.
- Refer to the figures below to get a better understanding.
This was all about the Encardio Rite EAN-70M Portable tiltmeter operating principle and taking readings.