Piezometers are geotechnical instruments used in the measurement of pore water pressure in soil, dams, concrete structures, etc.
Many different types of piezometers are used during geotechnical monitoring and instrumentation. Piezometer installation is done accurately and with precision to avoid future disruption in the readings.
Piezometer Installation in an embankment using Model EPP-30V
Encardio-rite Model EPP-30V is recommended for installation in an embankment.
The following steps are followed for the VW piezometer installation procedure.
- The first step in the installation of a piezometer in an embankment is to accurately mark the position where the piezometer is to be installed. It is recommended to position some sand/gravel to form a plain surface in the earth/rockfill or concrete dam.
- Take a geotextile bag and fill it with 2-4 mm of saturated sand. Insert the piezometer in it and tie the bag by pulling the lace. Assemble the products into a cylinder of about 75 mm φ.
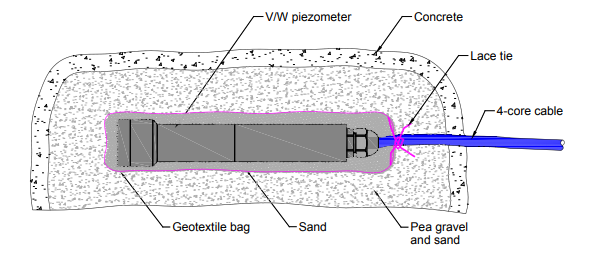
- Connect the leads to the readout unit. The reading displayed will be the “initial reading” to be entered into the sensor set-up data. It is also important to record the ambient temperature.
NOTE: Make sure to record the initial temperature and reading with the readout unit as it will form the zero reading for the piezometer. Also, note the barometric pressure at the time of initial reading.
- The next step is to completely cover the sensor and the adjoining cable all around with sand/gravel.
- In the case of an earth/rockfill dam, cover the sensor with enough backfill. For a concrete dam, shovel the concrete to a depth of 0.5 m to embed the sensor before commencing normal operations.
Also Read: Vibrating Wire Piezometer – Types and Operating Principle
Piezometer Installation in soft soil using Model EPP-50V
- Encardio-rite Model EPP-50V Push-in Piezometer is recommended for soft soil installation. The piezometer is equipped with a hard conical tip that allows it to be pushed into the soil at a required depth or into the base of a drilled borehole. The installation process is easy and does not require any elaborate grout sealing below and above the piezometer as required for other piezometer models.
- The push-in piezometer has the tip on one end and drills rod threads on the other. The two different thread makes it compatible with EW drill rods and cone penetrometer rods.
- The three stainless steel discs found just above the conical tip are placed around the cylindrical housing of the piezometer. When the piezometer is inserted into the soft soil, it is the discs that make intimate contact with the surrounding soil.
- The stainless steel discs along with the conical tip can be detached from the body of the piezometer. It is important to saturate or de-air the filters before installation. To do so, the conical tip is unscrewed, and the same process is described here- How Is Vibrating Wire Piezometer Installation Done? Reassemble the piezometer underwater after saturation.
- The push-in piezometer can be installed in both situations- where the piezometer is left in place and the other where it has to be retrieved after some time.
- In the case where the piezometer has to be recovered, it is preferable to screw it directly onto the end of the hollow drill rod. Make sure to first place the piezometer cable through the hole in the drill rod before setting the instrument. With a delicate push, the drill rod should be entered into the soil, keeping in mind that any rotation or hammering can damage the piezometer.
- To increase the piezometer tip installation depth, a series of drill rods are connected. Once the piezometer tip has reached the required depth, the instrument along with the drill rods are kept in place until it is time to retrieve them.
NOTE: The piezometer cable should be properly guided through the drill rods & the piezometer or its cable should never be allowed to rotate inside the rods. Care should also be taken to ensure that the drill rod edges do not cut into the cable sheathing while installing.
- It is important to keep an eye on the pressure reading on the readout unit while pushing the piezometer into the soil. The reading should not surpass the calibrated range of the piezometer. In the case where it does so, it is necessary to stop the process and allow the pressure to dissipate.
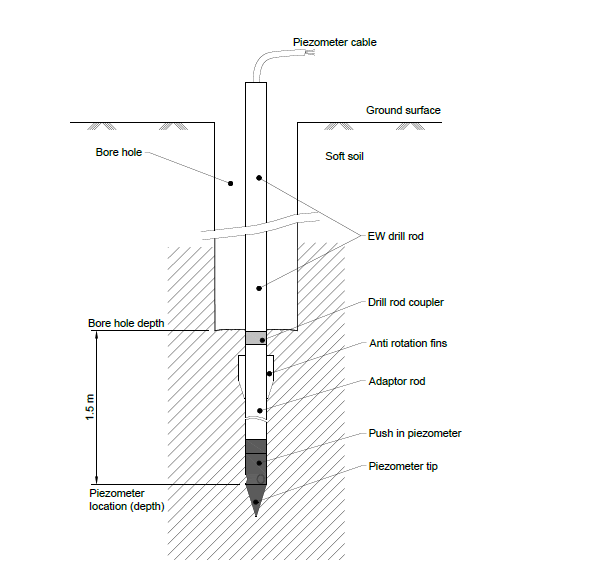
- Pushing the piezometer at great depths may damage the piezometer. In such cases, it is recommended to make a borehole of a diameter bigger than 100 mm to a depth of around 1.5 meters less than the final piezometer tip depth, using an auger or casing advanced boring. Doing so will ensure that the piezometer needs to be pushed in the final 1.5 meters of the soil only. This assures that the piezometer tip is isolated from the top and bottom layers and correctly measures the pore pressure at its depth.
- Once the job of the piezometer is done, it can be retrieved by pulling out the drill rods and used again in another location.
- If the piezometer is to be left permanently in place with only the drill rods to be recovered, there is a special adaptor rod, which is a modified version of the drill rod, available. At one end of the adaptor rod, the instrument is fixed while at the other end, a special left-hand/right-hand threaded coupler is fixed. Once the piezometer is fixed at the required depth, the drill rod/rod is rotated clockwise. This ensures that the coupler unscrews itself free from the adaptor rod. The anti-rotation fins of the adaptor rod prevent it from rotating while unscrewing the drill rods. The piezometer, along with the adaptor rod, is left in place while the drill rods are retrieved. Using this method, one adaptor rod is needed for each push-in piezometer while the same couplet can be reused for multiple installations.
NOTE: Make sure that the piezometer cable is inserted through the holes of the adaptor rod, coupling, and the first drill rod in that sequence, before fixing it. It is important to keep the piezometer fixed while rotating the adaptor rod, coupling, or drill rods, as any rotation will get damaged.
NOTE: Great care should be taken while unscrewing the drill rods from the rod adaptor as the piezometer cable running inside the drill rods does not get damaged due to abrasion from the drill rod surface or edges.
This was all about the piezometer installation procedure in an embankment and soft soil. If you’ve any questions or doubts, feel free to drop it in the comment section below.